什么是 nginx 高可用
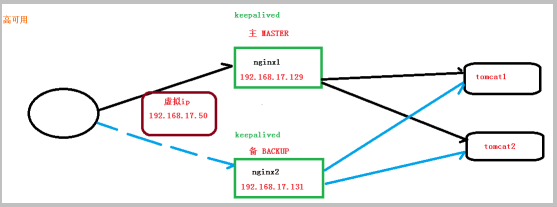
(1)需要两台 nginx 服务器
(2)需要 keepalived
(3)需要虚拟 ip
配置高可用的准备工作
(1)需要两台服务器 192.168.17.129 和 192.168.17.131
(2)在两台服务器安装 nginx
(3)在两台服务器安装 keepalived
在两台服务器安装 keepalived
(1)使用 yum 命令进行安装
yum install keepalived –y

安装之后,在 etc 里面生成目录 keepalived,有文件 keepalived.conf
完成高可用配置(主从配置)
(1)修改/etc/keepalived/keepalivec.conf 配置文件
global_defs {
 notification_email {
 acassen@firewall.loc
 failover@firewall.loc
 sysadmin@firewall.loc
 }
 notification_email_from Alexandre.Cassen@firewall.loc
 smtp_server 192.168.17.129
 smtp_connect_timeout 30
 router_id LVS_DEVEL
}
vrrp_script chk_http_port {
 script "/usr/local/src/nginx_check.sh"
 interval 2 #(检测脚本执行的间隔)
 weight 2
}
vrrp_instance VI_1 {
 state BACKUP # 备份服务器上将 MASTER 改为 BACKUP
 interface ens33 //网卡
 virtual_router_id 51 # 主、备机的 virtual_router_id 必须相同
 priority 90 # 主、备机取不同的优先级,主机值较大,备份机值较小
 advert_int 1
authentication {
 auth_type PASS
 auth_pass 1111
 }
 virtual_ipaddress {
 192.168.17.50 // VRRP H 虚拟地址
 }
}
(2)在/usr/local/src 添加检测脚本
#!/bin/bash
A=`ps -C nginx –no-header |wc -l`
if [ $A -eq 0 ];then
 /usr/local/nginx/sbin/nginx
 sleep 2
 if [ `ps -C nginx --no-header |wc -l` -eq 0 ];then
 killall keepalived
 fi
fi
(3)把两台服务器上 nginx 和 keepalived 启动
启动 nginx:./nginx
启动 keepalived:systemctl start keepalived.service
最终测试
(1)在浏览器地址栏输入 虚拟 ip 地址 192.168.17.50

(2)把主服务器(192.168.17.129)nginx 和 keepalived 停止,再输入 192.168.17.50

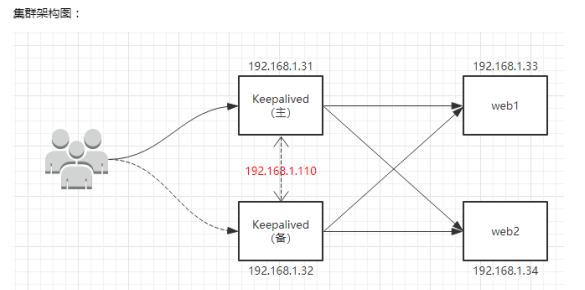
1.1、Keepalived+Nginx 高可用集群(主从模式)
global_defs {
 notification_email {
 acassen@firewall.loc
 failover@firewall.loc
 sysadmin@firewall.loc
 }
 notification_email_from Alexandre.Cassen@firewall.loc
 smtp_server 192.168.17.129
 smtp_connect_timeout 30
 router_id LVS_DEVEL
}
vrrp_script chk_http_port {
script "/usr/local/src/nginx_check.sh"
interval 2 #(检测脚本执行的间隔)
weight 2
}vrrp_instance VI_1 {
state BACKUP # 备份服务器上将 MASTER 改为 BACKUP
interface ens33 //网卡
virtual_router_id 51 # 主、备机的 virtual_router_id 必须相同
priority 100 # 主、备机取不同的优先级,主机值较大,备份机值较小
advert_int 1
authentication {
auth_type PASS
auth_pass 1111
}
virtual_ipaddress {
192.168.17.50 // VRRP H 虚拟地址
}
} #!/bin/bash
A=`ps -C nginx –no-header |wc -l`
if [ $A -eq 0 ];then
/usr/local/nginx/sbin/nginx
sleep 2
if [ `ps -C nginx --no-header |wc -l` -eq 0 ];then
killall keepalived
fi
fi (1)在所有节点上面进行配置
# systemctl stop firewalld //关闭防火墙
# sed -i 's/^SELINUX=.*/SELINUX=disabled/' /etc/sysconfig/selinux //关闭 selinux,重启
生效
# setenforce 0 //关闭 selinux,临时生效
# ntpdate 0.centos.pool.ntp.org //时间同步
# yum install nginx -y //安装 nginx
(2)配置后端 web 服务器(两台一样)
# echo "`hostname` `ifconfig ens33 |sed -n 's#.*inet \(.*\)netmask.*#\1#p'`" >
/usr/share/nginx/html/index.html //准备测试文件,此处是将主机名和 ip 写到 index.html 页
面中
# vim /etc/nginx/nginx.conf //编辑配置文件
user nginx;
worker_processes auto;
error_log /var/log/nginx/error.log;
pid /run/nginx.pid;
include /usr/share/nginx/modules/*.conf;
events {
worker_connections 1024;
}
http {
log_format main '$remote_addr - $remote_user [$time_local] "$request" '
'$status $body_bytes_sent "$http_referer" '
'"$http_user_agent" "$http_x_forwarded_for"';
access_log /var/log/nginx/access.log main;
sendfile on;
tcp_nopush on;
tcp_nodelay on;
keepalive_timeout 65;
types_hash_max_size 2048;
include /etc/nginx/mime.types;
default_type application/octet-stream;
include /etc/nginx/conf.d/*.conf;
server {
listen 80;
server_name www.mtian.org;
location / {
root /usr/share/nginx/html;
}
access_log /var/log/nginx/access.log main;
}
}# systemctl start nginx //启动 nginx
# systemctl enable nginx //加入开机启动(3)配置 LB 服务器(两台都一样)
# vim /etc/nginx/nginx.conf
user nginx;
worker_processes auto;
error_log /var/log/nginx/error.log;
pid /run/nginx.pid;
include /usr/share/nginx/modules/*.conf;
events {
 worker_connections 1024;
}
http {
 log_format main '$remote_addr - $remote_user [$time_local] "$request" '
 '$status $body_bytes_sent "$http_referer" '
 '"$http_user_agent" "$http_x_forwarded_for"';
 access_log /var/log/nginx/access.log main;
 sendfile on;
 tcp_nopush on;
 tcp_nodelay on;
 keepalive_timeout 65;
 types_hash_max_size 2048;
 include /etc/nginx/mime.types;
 default_type application/octet-stream;
 include /etc/nginx/conf.d/*.conf;
 upstream backend {
 server 192.168.1.33:80 weight=1 max_fails=3 fail_timeout=20s;
 server 192.168.1.34:80 weight=1 max_fails=3 fail_timeout=20s;
 }
 server {
 listen 80;
 server_name www.mtian.org;
 location / {
 proxy_pass http://backend;
 proxy_set_header Host $host:$proxy_port;
 proxy_set_header X-Forwarded-For $remote_addr;
 }
 }
}
# systemctl start nginx //启动 nginx
# systemctl enable nginx //加入开机自启动
(4)在测试机(192.168.1.35)上面添加 host 解析,并测试 lb 集群是否正常。(测试机任意都可以,
只要能访问 lb 节点。)
[root@node01 ~]# cat /etc/hosts
127.0.0.1 localhost localhost.localdomain localhost4 localhost4.localdomain4
::1 localhost localhost.localdomain localhost6 localhost6.localdomain6
192.168.1.32 www.mtian.org
192.168.1.31 www.mtian.org
// 测试时候轮流关闭 lb1 和 lb2 节点,关闭后还是能够访问并看到轮循效果即表示 nginx lb 集群搭建
成功。
[root@node01 ~]# curl www.mtian.org
web01 192.168.1.33
[root@node01 ~]# curl www.mtian.org
web02 192.168.1.34
[root@node01 ~]# curl www.mtian.org
web01 192.168.1.33
[root@node01 ~]# curl www.mtian.org
web02 192.168.1.34
[root@node01 ~]# curl www.mtian.org
web01 192.168.1.33
[root@node01 ~]# curl www.mtian.org
web02 192.168.1.34
(5)上面步骤成功后,开始搭建 keepalived,在两台 lb 节点上面安装 keepalived(也可以源码编译安
装、此处直接使用 yum 安装)
# yum install keepalived -y
(6)配置 LB-01 节点
[root@LB-01 ~]# vim /etc/keepalived/keepalived.conf
! Configuration File for keepalived
global_defs {
notification_email {
381347268@qq.com
}
smtp_server 192.168.200.1
smtp_connect_timeout 30
router_id LVS_DEVEL
}
vrrp_instance VI_1 {
state MASTER
interface ens33
virtual_router_id 51
priority 150
advert_int 1
authentication {
auth_type PASS
auth_pass 1111
}
virtual_ipaddress {
192.168.1.110/24 dev ens33 label ens33:1
}
}
[root@LB-01 ~]# systemctl start keepalived //启动 keepalived
[root@LB-01 ~]# systemctl enable keepalived //加入开机自启动
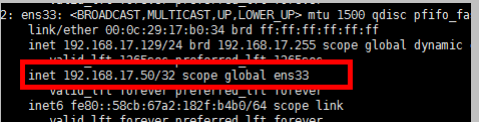
[root@LB-01 ~]# ip a //查看 IP,会发现多出了 VIP 192.168.1.110
......
2: ens33: <BROADCAST,MULTICAST,UP,LOWER_UP> mtu 1500 qdisc pfifo_fast state UP qlen 1000
link/ether 00:0c:29:94:17:44 brd ff:ff:ff:ff:ff:ff
inet 192.168.1.31/24 brd 192.168.1.255 scope global ens33
valid_lft forever preferred_lft forever
inet 192.168.1.110/24 scope global secondary ens33:1
valid_lft forever preferred_lft forever
inet6 fe80::20c:29ff:fe94:1744/64 scope link
valid_lft forever preferred_lft forever
......(7)配置 LB-02 节点
[root@LB-02 ~]# vim /etc/keepalived/keepalived.conf
! Configuration File for keepalived
global_defs {
 notification_email {
 381347268@qq.com
 }
 smtp_server 192.168.200.1
 smtp_connect_timeout 30
 router_id LVS_DEVEL
}
vrrp_instance VI_1 {
 state BACKUP
 interface ens33
 virtual_router_id 51
 priority 100
 advert_int 1
 authentication {
 auth_type PASS
 auth_pass 1111
 }
 virtual_ipaddress {
 192.168.1.110/24 dev ens33 label ens33:1
 }
}
[root@LB-02 ~]# systemctl start keepalived //启动 keepalived
[root@LB-02 ~]# systemctl enable keepalived //加入开机自启动
[root@LB-02 ~]# ifconfig //查看 IP,此时备节点不会有 VIP(只有当主挂了的时候,VIP 才会飘到备
节点)
ens33: flags=4163<UP,BROADCAST,RUNNING,MULTICAST> mtu 1500
 inet 192.168.1.32 netmask 255.255.255.0 broadcast 192.168.1.255
 inet6 fe80::20c:29ff:feab:6532 prefixlen 64 scopeid 0x20<link>
 ether 00:0c:29:ab:65:32 txqueuelen 1000 (Ethernet)
 RX packets 43752 bytes 17739987 (16.9 MiB)
 RX errors 0 dropped 0 overruns 0 frame 0
 TX packets 4177 bytes 415805 (406.0 KiB)
 TX errors 0 dropped 0 overruns 0 carrier 0 collisions 0
......
(8)在测试机器上面访问 Keepalived 上面配置的 VIP 192.168.1.110
[root@node01 ~]# curl 192.168.1.110
web01 192.168.1.33
[root@node01 ~]# curl 192.168.1.110
web02 192.168.1.34
[root@node01 ~]# curl 192.168.1.110
web01 192.168.1.33
[root@node01 ~]# curl 192.168.1.110
web02 192.168.1.34
//关闭 LB-01 节点上面 keepalived 主节点。再次访问
[root@LB-01 ~]# systemctl stop keepalived
[root@node01 ~]#
[root@node01 ~]# curl 192.168.1.110
web01 192.168.1.33
[root@node01 ~]# curl 192.168.1.110
web02 192.168.1.34
[root@node01 ~]# curl 192.168.1.110
web01 192.168.1.33
[root@node01 ~]# curl 192.168.1.110
web02 192.168.1.34
//此时查看 LB-01 主节点上面的 IP ,发现已经没有了 VIP
[root@LB-01 ~]# ifconfig
ens33: flags=4163<UP,BROADCAST,RUNNING,MULTICAST> mtu 1500
 inet 192.168.1.31 netmask 255.255.255.0 broadcast 192.168.1.255
 inet6 fe80::20c:29ff:fe94:1744 prefixlen 64 scopeid 0x20<link>
 ether 00:0c:29:94:17:44 txqueuelen 1000 (Ethernet)
 RX packets 46813 bytes 18033403 (17.1 MiB)
 RX errors 0 dropped 0 overruns 0 frame 0
 TX packets 9350 bytes 1040882 (1016.4 KiB)
 TX errors 0 dropped 0 overruns 0 carrier 0 collisions 0
...
//查看 LB-02 备节点上面的 IP,发现 VIP 已经成功飘过来了
[root@LB-02 ~]# ifconfig
ens33: flags=4163<UP,BROADCAST,RUNNING,MULTICAST> mtu 1500
 inet 192.168.1.32 netmask 255.255.255.0 broadcast 192.168.1.255
 inet6 fe80::20c:29ff:feab:6532 prefixlen 64 scopeid 0x20<link>
 ether 00:0c:29:ab:65:32 txqueuelen 1000 (Ethernet)
 RX packets 44023 bytes 17760070 (16.9 MiB)
 RX errors 0 dropped 0 overruns 0 frame 0
 TX packets 4333 bytes 430037 (419.9 KiB)
 TX errors 0 dropped 0 overruns 0 carrier 0 collisions 0
ens33:1: flags=4163<UP,BROADCAST,RUNNING,MULTICAST> mtu 1500
 inet 192.168.1.110 netmask 255.255.255.0 broadcast 0.0.0.0
 ether 00:0c:29:ab:65:32 txqueuelen 1000 (Ethernet)
...
到此,Keepalived+Nginx 高可用集群就搭建完成了。
1.2、Keepalived+Nginx 高可用集群(双主模式)
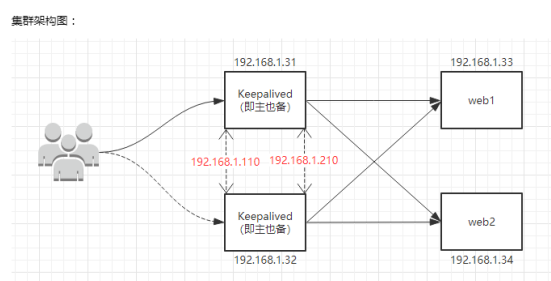
说明:还是按照上面的环境继续做实验,只是修改 LB 节点上面的 keepalived 服务的配置文件即可。此时
LB-01 节点即为 Keepalived 的主节点也为备节点,LB-02 节点同样即为 Keepalived 的主节点也为备节点。
LB-01 节点默认的主节点 VIP(192.168.1.110),LB-02 节点默认的主节点 VIP(192.168.1.210)
(1)配置 LB-01 节点
[root@LB-01 ~]# vim /etc/keepalived/keepalived.conf //编辑配置文件,增加一段新的
vrrp_instance 规则
! Configuration File for keepalived
global_defs {
notification_email {
381347268@qq.com
}
smtp_server 192.168.200.1
smtp_connect_timeout 30
router_id LVS_DEVEL
}
vrrp_instance VI_1 {
state MASTER
interface ens33
virtual_router_id 51
priority 150
advert_int 1
authentication {
auth_type PASS
auth_pass 1111
}
virtual_ipaddress {
192.168.1.110/24 dev ens33 label ens33:1
}
}
vrrp_instance VI_2 {
state BACKUP
interface ens33
virtual_router_id 52
priority 100
advert_int 1
authentication {
auth_type PASS
auth_pass 2222
}
virtual_ipaddress {
192.168.1.210/24 dev ens33 label ens33:2
}
}
[root@LB-01 ~]# systemctl restart keepalived //重新启动 keepalived
// 查看 LB-01 节点的 IP 地址,发现 VIP(192.168.1.110)同样还是默认在该节点
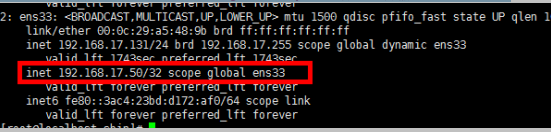
[root@LB-01 ~]# ip a
2: ens33: <BROADCAST,MULTICAST,UP,LOWER_UP> mtu 1500 qdisc pfifo_fast state UP qlen 1000
link/ether 00:0c:29:94:17:44 brd ff:ff:ff:ff:ff:ff
inet 192.168.1.31/24 brd 192.168.1.255 scope global ens33
valid_lft forever preferred_lft forever
inet 192.168.1.110/24 scope global secondary ens33:1
valid_lft forever preferred_lft forever
inet6 fe80::20c:29ff:fe94:1744/64 scope link
valid_lft forever preferred_lft forever(2)配置 LB-02 节点
[root@LB-02 ~]# vim /etc/keepalived/keepalived.conf //编辑配置文件,增加一段新的
vrrp_instance 规则
! Configuration File for keepalived
global_defs {
 notification_email {
 381347268@qq.com
 }
 smtp_server 192.168.200.1
 smtp_connect_timeout 30
 router_id LVS_DEVEL
}
vrrp_instance VI_1 {
 state BACKUP
 interface ens33
 virtual_router_id 51
 priority 100
 advert_int 1
 authentication {
 auth_type PASS
 auth_pass 1111
 }
 virtual_ipaddress {
 192.168.1.110/24 dev ens33 label ens33:1
 }
}
vrrp_instance VI_2 {
 state MASTER
 interface ens33
 virtual_router_id 52
 priority 150
 advert_int 1
 authentication {
 auth_type PASS
 auth_pass 2222
 }
 virtual_ipaddress {
 192.168.1.210/24 dev ens33 label ens33:2
 }
}
[root@LB-02 ~]# systemctl restart keepalived //重新启动 keepalived
// 查看 LB-02 节点 IP,会发现也多了一个 VIP(192.168.1.210),此时该节点也就是一个主了。
[root@LB-02 ~]# ip a
2: ens33: <BROADCAST,MULTICAST,UP,LOWER_UP> mtu 1500 qdisc pfifo_fast state UP qlen 1000
link/ether 00:0c:29:ab:65:32 brd ff:ff:ff:ff:ff:ff
 inet 192.168.1.32/24 brd 192.168.1.255 scope global ens33
 valid_lft forever preferred_lft forever
 inet 192.168.1.210/24 scope global secondary ens33:2
 valid_lft forever preferred_lft forever
 inet6 fe80::20c:29ff:feab:6532/64 scope link
 valid_lft forever preferred_lft forever
(3)测试
[root@node01 ~]# curl 192.168.1.110
web01 192.168.1.33
[root@node01 ~]# curl 192.168.1.110
web02 192.168.1.34
[root@node01 ~]# curl 192.168.1.210
web01 192.168.1.33
[root@node01 ~]# curl 192.168.1.210
web02 192.168.1.34
// 停止 LB-01 节点的 keepalived 再次测试
[root@LB-01 ~]# systemctl stop keepalived
[root@node01 ~]# curl 192.168.1.110
web01 192.168.1.33
[root@node01 ~]# curl 192.168.1.110
web02 192.168.1.34
[root@node01 ~]# curl 192.168.1.210
web01 192.168.1.33
[root@node01 ~]# curl 192.168.1.210
web02 192.168.1.34
测试可以发现我们访问 keepalived 中配置的两个 VIP 都可以正常调度等,当我们停止任意一台 keepalived
节点,同样还是正常访问;到此,keepalived+nginx 高可用集群(双主模式)就搭建完成了。