1、学校OA系统的采购审批项目:需求是
采购员采购教学器材
1)如果金额小于等于5000,由教学主任审批(0<=x<=5000)
2)如果金额小于等于10000,由院长审批(5000<x<=10000)
3)如果金额小于等于30000,由副校长审批(10000<x<=30000)
4)如果金额超过30000 以上,有校长审批( 30000<x)
请设计程序完成采购审批项目
2、传统方案解决OA系统审批,传统的设计方案(类图)
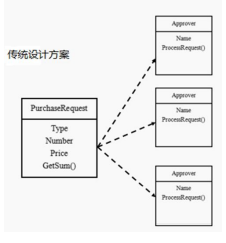
3、传统方案解决OA系统审批问题分析
l)传统方式是:接收到一个采购请求后,根据采购金额来调用对应的Approver(审批人)完成审批。
2)传统方式的问题分析:客户端这里会使用到分支判断(比如 switch)来对不同的采购请求处理,这样就存在
如下问题(l)如果各个级别的人员审批金额发生变化,在客户端的也需要变化(2)客户端必须明确的知道有多少个审批级别和访问
3)这样对一个采购请求进行处理和Approver(审批人)就存在强耦合关系,不利于代码的扩展和维护
4)解决方案=》职责链模式
4、职责链模式基本介绍
基本介绍
1)职责链模式(Chain of Responsibility Patterm),又叫责任链模式,为请求创建了一个接收者对象的链(简单示意
图)。这种模式对请求的发送者和接收者进行解耦。
2)职责链模式通常每个接收者都包含对另一个接收者的引用。如果一个对象不能处理该请求,那么它会把相同的
请求传给下一个接收者,依此类推。
3)这种类型的设计模式属于行为型模式
5、职责链模式的原理类图
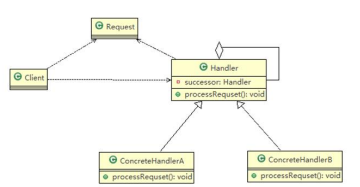
对原理类图的说明-即(职责链模式的角色及职责)
1) Handler :抽象的处理者,定义了一个处理请求的接口,同时包含另外 Handler
2) ConcretcHandlerA,B是具体的处理者,处理它自己负责的请求,可以访问它的后继者(即下一个处理者),如果
可以处理当前请求,则处理,否则就将该请求交个后继者去处理,从而形成一个职责链
3)Request ,含义很多属性,表示一个请求
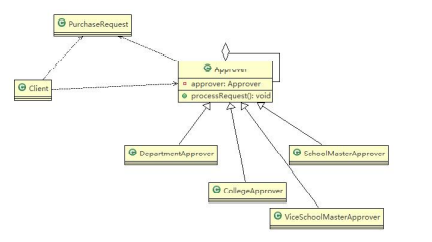
6、职责链模式解决OA系统采购审批
1)应用实例要求
编写程序完成学校OA系统的采购审批项目:需求
采购员采购教学器材
如果金额小于等于5000,由教学主任审批
如果金额小于等于10000,由院长审批
如果金额小于等于30000,由副校长审批
如果金额超过30000 以上,有校长审批
2)思路分析和图解(类图)
3)代码实现
Approver:
public abstract class Approver {

	Approver approver;  //下一个处理者
	String name; // 名字

	public Approver(String name) {
		// TODO Auto-generated constructor stub
		this.name = name;
	}

	//下一个处理者
	public void setApprover(Approver approver) {
		this.approver = approver;
	}

	//处理审批请求的方法,得到一个请求, 处理是子类完成,因此该方法做成抽象
	public abstract void processRequest(PurchaseRequest purchaseRequest);

}
Client:
public class Client {

	public static void main(String[] args) {
		// TODO Auto-generated method stub
		//创建一个请求
		PurchaseRequest purchaseRequest = new PurchaseRequest(1, 31000, 1);

		//创建相关的审批人
		DepartmentApprover departmentApprover = new DepartmentApprover("张主任");
		CollegeApprover collegeApprover = new CollegeApprover("李院长");
		ViceSchoolMasterApprover viceSchoolMasterApprover = new ViceSchoolMasterApprover("王副校");
		SchoolMasterApprover schoolMasterApprover = new SchoolMasterApprover("佟校长");


		//需要将各个审批级别的下一个设置好 (处理人构成环形: )
		departmentApprover.setApprover(collegeApprover);
		collegeApprover.setApprover(viceSchoolMasterApprover);
		viceSchoolMasterApprover.setApprover(schoolMasterApprover);
		schoolMasterApprover.setApprover(departmentApprover);


		departmentApprover.processRequest(purchaseRequest);
		viceSchoolMasterApprover.processRequest(purchaseRequest);
	}

}
CollegeApprover:
public class CollegeApprover extends Approver {

	public CollegeApprover(String name) {
		// TODO Auto-generated constructor stub
		super(name);
	}

	@Override
	public void processRequest(PurchaseRequest purchaseRequest) {
		// TODO Auto-generated method stub
		if(purchaseRequest.getPrice() < 5000 && purchaseRequest.getPrice() <= 10000) {
			System.out.println(" 请求编号 id= " + purchaseRequest.getId() + " 被 " + this.name + " 处理");
		}else {
			approver.processRequest(purchaseRequest);
		}
	}
}
DepartmentApprover:
public class DepartmentApprover extends Approver {


	public DepartmentApprover(String name) {
		// TODO Auto-generated constructor stub
		super(name);
	}

	@Override
	public void processRequest(PurchaseRequest purchaseRequest) {
		// TODO Auto-generated method stub
		if(purchaseRequest.getPrice() <= 5000) {
			System.out.println(" 请求编号 id= " + purchaseRequest.getId() + " 被 " + this.name + " 处理");
		}else {
			approver.processRequest(purchaseRequest);
		}
	}

}
PurchaseRequest:
//请求类
public class PurchaseRequest {

	private int type = 0; //请求类型
	private float price = 0.0f; //请求金额
	private int id = 0;
	//构造器
	public PurchaseRequest(int type, float price, int id) {
		this.type = type;
		this.price = price;
		this.id = id;
	}
	public int getType() {
		return type;
	}
	public float getPrice() {
		return price;
	}
	public int getId() {
		return id;
	}


}
SchoolMasterApprover:
public class SchoolMasterApprover extends Approver {

	public SchoolMasterApprover(String name) {
		// TODO Auto-generated constructor stub
		super(name);
	}

	@Override
	public void processRequest(PurchaseRequest purchaseRequest) {
		// TODO Auto-generated method stub
		if(purchaseRequest.getPrice() > 30000) {
			System.out.println(" 请求编号 id= " + purchaseRequest.getId() + " 被 " + this.name + " 处理");
		}else {
			approver.processRequest(purchaseRequest);
		}
	}
}
ViceSchoolMasterApprover:
public class ViceSchoolMasterApprover extends Approver {

	public ViceSchoolMasterApprover(String name) {
		// TODO Auto-generated constructor stub
		super(name);
	}

	@Override
	public void processRequest(PurchaseRequest purchaseRequest) {
		// TODO Auto-generated method stub
		if(purchaseRequest.getPrice() < 10000 && purchaseRequest.getPrice() <= 30000) {
			System.out.println(" 请求编号 id= " + purchaseRequest.getId() + " 被 " + this.name + " 处理");
		}else {
			approver.processRequest(purchaseRequest);
		}
	}
}
7、职责链模式在 SpringMVC框架应用的源码分析
1)SpringMVC-HandlerExecutionChain类就使用到职责链模式
2) SpringMVC请求流程简图
3)代码分析+Debug 源码+说明
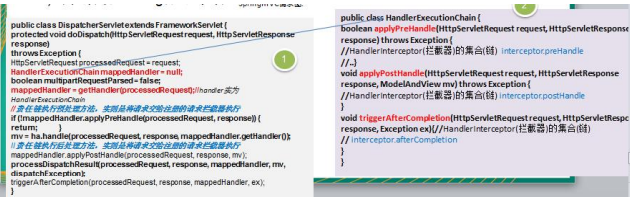
4)源码和说明
public class ResponsibilityChain {

	public static void main(String[] args) {
		// TODO Auto-generated method stub

		// DispatcherServlet

		//说明
		/*
		 *
		 *  protected void doDispatch(HttpServletRequest request, HttpServletResponse response) throws Exception {
		 *   HandlerExecutionChain mappedHandler = null;
		 *   mappedHandler = getHandler(processedRequest);//获取到HandlerExecutionChain对象
		 *    //在 mappedHandler.applyPreHandle 内部 得到啦 HandlerInterceptor interceptor
		 *    //调用了拦截器的  interceptor.preHandle
		 *   if (!mappedHandler.applyPreHandle(processedRequest, response)) {
					return;
				}

			  //说明:mappedHandler.applyPostHandle 方法内部获取到拦截器,并调用
			  //拦截器的  interceptor.postHandle(request, response, this.handler, mv);
			 mappedHandler.applyPostHandle(processedRequest, response, mv);
		 *  }
		 *
		 *
		 *  //说明:在  mappedHandler.applyPreHandle内部中,
		 *  还调用了  triggerAfterCompletion 方法,该方法中调用了
		 *  HandlerInterceptor interceptor = getInterceptors()[i];
			try {
				interceptor.afterCompletion(request, response, this.handler, ex);
			}
			catch (Throwable ex2) {
				logger.error("HandlerInterceptor.afterCompletion threw exception", ex2);
			}
		 */

	}

}
5)对源码总结
springmvc请求的流程图中,执行了拦截器相关方法 interceptor.preHandler等等
在处理SpringMvc请求时,使用到职责链模式还使用到适配器模式
HandlerExecutionChain主要负责的是请求拦截器的执行和请求处理,但是他本身不处理请求,只是将请求分配给链上注册处理器执行,这是职责链实现方式,减少职责链本身与处理逻辑之间的耦合,规范了处理流程
HandlerExecutionChain维护了HandlerInterceptor的集合,可以向其中注册相应的拦截器.
8、职责链模式的注意事项和细节
1)将请求和处理分开,实现解耦,提高系统的灵活性
2)简化了对象,使对象不需要知道链的结构
3)性能会受到影响,特别是在链比较长的时候,因此需控制链中最大节点数量,一般通过在Handler中设置一个
最大节点数量,在setNext()方法中判断是否已经超过阀值,超过则不允许该链建立,避免出现超长链无意识地破坏系统性能
4)调试不方便。采用了类似递归的方式,调试时逻辑可能比较复杂
5)最佳应用场景:有多个对象可以处理同一个请求时,比如:多级请求、请假/加薪等审批流程、Java Web 中Tomcat
对Encoding的处理、拦截器
2025-03-12 start
Springboot中责任链的实现:
1. 定义处理器接口
首先,定义一个处理器接口,所有具体的处理器都需要实现这个接口。
public interface Handler {
    void setNext(Handler handler);
    void handle(Request request);
}
2. 创建抽象处理器类
接下来,创建一个抽象处理器类,它实现了 Handler 接口,并提供了设置下一个处理器的逻辑。
3. 创建具体的处理器
然后,创建具体的处理器类,继承自 AbstractHandler,并实现具体的处理逻辑。
@Component
public class FirstHandler extends AbstractHandler {
    @Override
    public void handle(Request request) {
        // 具体的处理逻辑
        if (request.getType().equals("Type1")) {
            System.out.println("FirstHandler is handling the request.");
        } else {
            super.handle(request);
        }
    }
}

@Component
public class SecondHandler extends AbstractHandler {
    @Override
    public void handle(Request request) {
        // 具体的处理逻辑
        if (request.getType().equals("Type2")) {
            System.out.println("SecondHandler is handling the request.");
        } else {
            super.handle(request);
        }
    }
}

@Component
public class ThirdHandler extends AbstractHandler {
    @Override
    public void handle(Request request) {
        // 具体的处理逻辑
        if (request.getType().equals("Type3")) {
            System.out.println("ThirdHandler is handling the request.");
        } else {
            super.handle(request);
        }
    }
}
4. 创建请求类
定义一个请求类,用于传递请求数据。
5. 配置责任链
在 Spring Boot 中,可以使用 @Autowired 注解来自动装配处理器,并配置责任链。
6. 使用责任链
最后,在控制器或服务中使用责任链来处理请求。
7. 运行应用
启动 Spring Boot 应用后,访问 /handle 端点并传递不同的 type 参数,可以看到不同的处理器处理请求。
例如:
-
访问
/handle?type=Type1,输出FirstHandler is handling the request. -
访问
/handle?type=Type2,输出SecondHandler is handling the request. -
访问
/handle?type=Type3,输出ThirdHandler is handling the request.
总结
通过责任链模式,你可以将复杂的处理逻辑分解为多个独立的处理器,每个处理器只负责处理特定的请求类型。这种模式使得代码更加模块化,易于扩展和维护。在 Spring Boot 中,结合依赖注入可以更方便地管理和配置责任链。
end