1、搭建flutter的开发环境:http://www.haijin.xyz/article/730
2、创建一个项目:
flutter create layout
这个demo只是管页面布局,比较简单,所以我们只在main.dart中操作
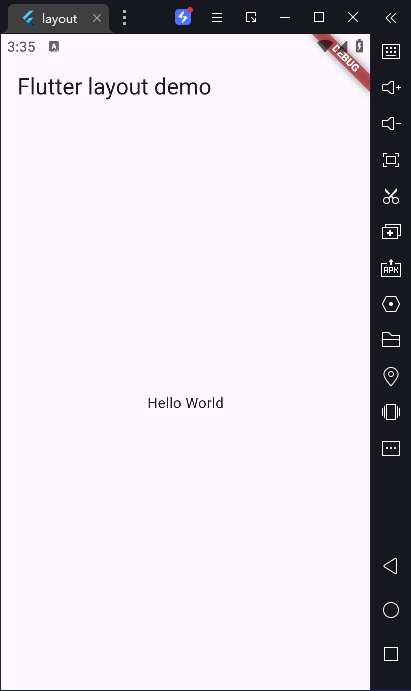
1)在屏幕中间输出“Hello World”
import 'package:flutter/material.dart';

void main() => runApp(const MyApp());

class MyApp extends StatelessWidget {
  const MyApp({super.key});

  @override
  Widget build(BuildContext context) {
    const String appTitle = 'Flutter layout demo';
    return MaterialApp(
      title: appTitle,
      home: Scaffold(
        appBar: AppBar(
          title: const Text(appTitle),
        ),
        body: const Center(
          child: Text('Hello World'),
        ),
      ),
    );
  }
}
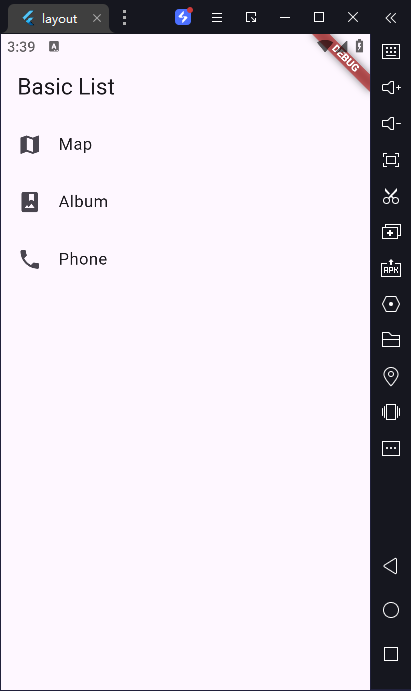
2)创建一个 ListView
使用标准的 ListView 构造方法非常适合只有少量数据的列表。
import 'package:flutter/material.dart';

void main() => runApp(const MyApp());

class MyApp extends StatelessWidget {
  const MyApp({super.key});

  @override
  Widget build(BuildContext context) {
    const title = 'Basic List';

    return MaterialApp(
      title: title,
      home: Scaffold(
        appBar: AppBar(
          title: const Text(title),
        ),
        body: ListView(
          children: const <Widget>[
            ListTile(
              leading: Icon(Icons.map),
              title: Text('Map'),
            ),
            ListTile(
              leading: Icon(Icons.photo_album),
              title: Text('Album'),
            ),
            ListTile(
              leading: Icon(Icons.phone),
              title: Text('Phone'),
            ),
          ],
        ),
      ),
    );
  }
}
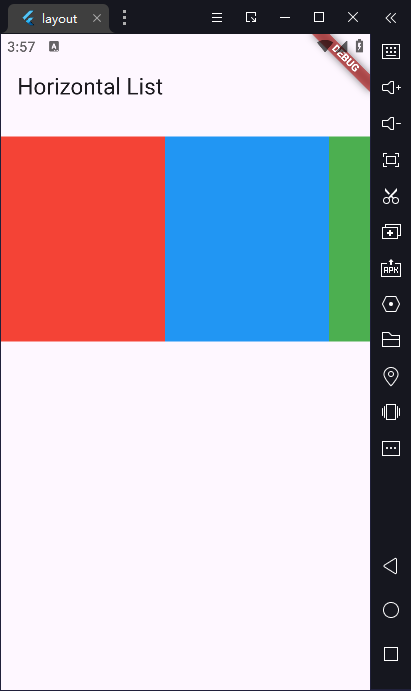
3)创建一个水平滑动的列表
有时,你可能想要创建一个水平滑动(而不是竖直滑动)的列表。 ListView widget 本身就支持水平列表的创建。
我们将会使用标准的 ListView 构造方法,通过指定 scrollDirection 的值为水平方向,来覆盖默认的竖直方向。
import 'package:flutter/material.dart';

void main() => runApp(const MyApp());

class MyApp extends StatelessWidget {
  const MyApp({super.key});

  @override
  Widget build(BuildContext context) {
    const title = 'Horizontal List';

    return MaterialApp(
      title: title,
      home: Scaffold(
        appBar: AppBar(
          title: const Text(title),
        ),
        body: Container(
          margin: const EdgeInsets.symmetric(vertical: 20),
          height: 200,
          child: ListView(
            // This next line does the trick.
            scrollDirection: Axis.horizontal,
            children: <Widget>[
              Container(
                width: 160,
                color: Colors.red,
              ),
              Container(
                width: 160,
                color: Colors.blue,
              ),
              Container(
                width: 160,
                color: Colors.green,
              ),
              Container(
                width: 160,
                color: Colors.yellow,
              ),
              Container(
                width: 160,
                color: Colors.orange,
              ),
            ],
          ),
        ),
      ),
    );
  }
}
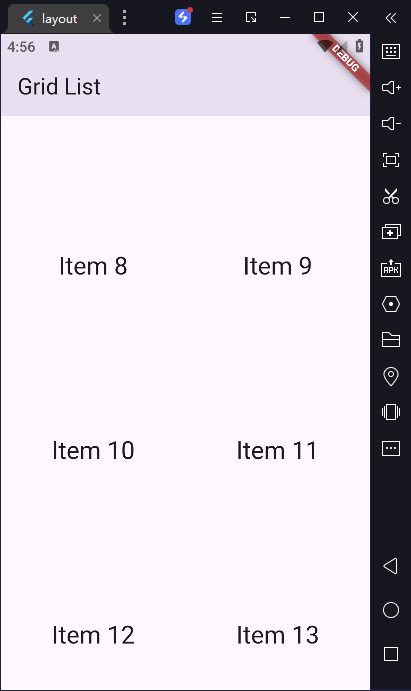
4) 创建一个网格列表
有时候,你可能希望用网格来展示内容,而不是一条接着一条的普通列表来展示。在本文当中,我们将采用 GridView widget。
用网格展示数据最简单的方式,就是通过使用 GridView.count() 构造方法,因为它允许我们指定有多少行多少列。
为了帮助我们想象 GridView 是如何工作的,在这个例子中,我们将创建一个包含有 100 个 widget 的 List,每个 Widget 将展示它在 List 中的索引。
import 'package:flutter/material.dart';

void main() {
  runApp(const MyApp());
}

class MyApp extends StatelessWidget {
  const MyApp({super.key});

  @override
  Widget build(BuildContext context) {
    const title = 'Grid List';

    return MaterialApp(
      title: title,
      home: Scaffold(
        appBar: AppBar(
          title: const Text(title),
        ),
        body: GridView.count(
          // Create a grid with 2 columns. If you change the scrollDirection to
          // horizontal, this produces 2 rows.
          crossAxisCount: 2,
          // Generate 100 widgets that display their index in the List.
          children: List.generate(100, (index) {
            return Center(
              child: Text(
                'Item $index',
                style: Theme.of(context).textTheme.headlineSmall,
              ),
            );
          }),
        ),
      ),
    );
  }
}
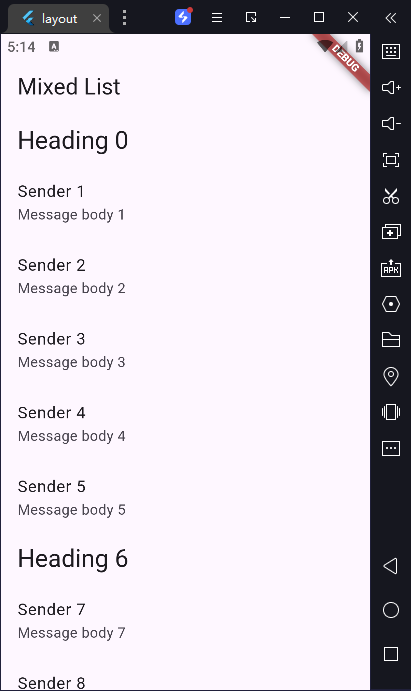
5)创建拥有不同列表项的列表
我们经常需要创建展示不同类型内容的列表。比方说,我们可能在开发一个列表,它显示一个标题,后跟一些与标题相关的项目,然后是另一个标题,依此类推。
你可以通过以下步骤,用 Flutter 创建这样的结构:
-
创建一个拥有不同类型项目的数据源
-
将数据源的数据转换成列表 widget
import 'package:flutter/material.dart';

void main() {
  runApp(
    MyApp(
      items: List<ListItem>.generate(
        1000,
            (i) => i % 6 == 0
            ? HeadingItem('Heading $i')
            : MessageItem('Sender $i', 'Message body $i'),
      ),
    ),
  );
}

class MyApp extends StatelessWidget {
  final List<ListItem> items;

  const MyApp({super.key, required this.items});

  @override
  Widget build(BuildContext context) {
    const title = 'Mixed List';

    return MaterialApp(
      title: title,
      home: Scaffold(
        appBar: AppBar(
          title: const Text(title),
        ),
        body: ListView.builder(
          // Let the ListView know how many items it needs to build.
          itemCount: items.length,
          // Provide a builder function. This is where the magic happens.
          // Convert each item into a widget based on the type of item it is.
          itemBuilder: (context, index) {
            final item = items[index];

            return ListTile(
              title: item.buildTitle(context),
              subtitle: item.buildSubtitle(context),
            );
          },
        ),
      ),
    );
  }
}

/// The base class for the different types of items the list can contain.
abstract class ListItem {
  /// The title line to show in a list item.
  Widget buildTitle(BuildContext context);

  /// The subtitle line, if any, to show in a list item.
  Widget buildSubtitle(BuildContext context);
}

/// A ListItem that contains data to display a heading.
class HeadingItem implements ListItem {
  final String heading;

  HeadingItem(this.heading);

  @override
  Widget buildTitle(BuildContext context) {
    return Text(
      heading,
      style: Theme.of(context).textTheme.headlineSmall,
    );
  }

  @override
  Widget buildSubtitle(BuildContext context) => const SizedBox.shrink();
}

/// A ListItem that contains data to display a message.
class MessageItem implements ListItem {
  final String sender;
  final String body;

  MessageItem(this.sender, this.body);

  @override
  Widget buildTitle(BuildContext context) => Text(sender);

  @override
  Widget buildSubtitle(BuildContext context) => Text(body);
}
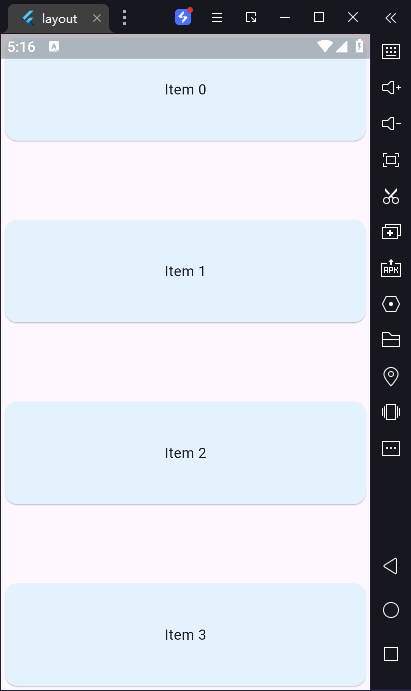
6) 用空格隔开的项目列表
import 'package:flutter/material.dart';

void main() => runApp(const SpacedItemsList());

class SpacedItemsList extends StatelessWidget {
  const SpacedItemsList({super.key});

  @override
  Widget build(BuildContext context) {
    const items = 4;

    return MaterialApp(
      title: 'Flutter Demo',
      debugShowCheckedModeBanner: false,
      theme: ThemeData(
        colorScheme: ColorScheme.fromSeed(seedColor: Colors.deepPurple),
        cardTheme: CardTheme(color: Colors.blue.shade50),
        useMaterial3: true,
      ),
      home: Scaffold(
        body: LayoutBuilder(builder: (context, constraints) {
          return SingleChildScrollView(
            child: ConstrainedBox(
              constraints: BoxConstraints(minHeight: constraints.maxHeight),
              child: Column(
                mainAxisAlignment: MainAxisAlignment.spaceBetween,
                crossAxisAlignment: CrossAxisAlignment.stretch,
                children: List.generate(
                    items, (index) => ItemWidget(text: 'Item $index')),
              ),
            ),
          );
        }),
      ),
    );
  }
}

class ItemWidget extends StatelessWidget {
  const ItemWidget({
    super.key,
    required this.text,
  });

  final String text;

  @override
  Widget build(BuildContext context) {
    return Card(
      child: SizedBox(
        height: 100,
        child: Center(child: Text(text)),
      ),
    );
  }
}
7)长列表的处理
标准的 ListView 构造函数适用于短列表,对于具有大量列表项的长列表,需要用 ListView.builder 构造函数来创建。
与标准的 ListView 构造函数需要一次性创建所有列表项不同的是, ListView.builder 构造函数只在列表项从屏幕外滑入屏幕时才去创建列表项。

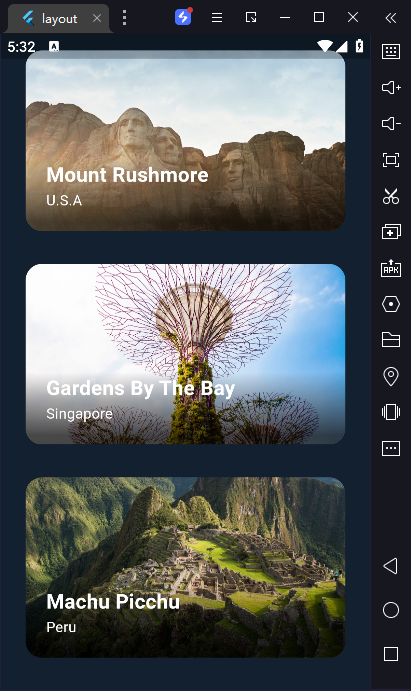
8)创建一个滚动视差效果
当你在应用程序中滚动卡片列表(例如包含图像)时,你可能会注意到这些图像看起来比屏幕上的其他部分滚动得慢。看起来好像列表中的卡片在前景中,但图像本身位于遥远的背景中。这种效果被称为视差。
在这个配方中,您通过构建一个卡片列表(圆角包含一些文本)来创建视差效果。每张卡片还包含一个图像。当卡片在屏幕上滑动时,每张卡片内的图像也会向下滑动。
import 'package:flutter/material.dart';
import 'package:flutter/rendering.dart';

const Color darkBlue = Color.fromARGB(255, 18, 32, 47);

void main() {
  runApp(const MyApp());
}

class MyApp extends StatelessWidget {
  const MyApp({super.key});

  @override
  Widget build(BuildContext context) {
    return MaterialApp(
      theme: ThemeData.dark().copyWith(scaffoldBackgroundColor: darkBlue),
      debugShowCheckedModeBanner: false,
      home: const Scaffold(
        body: Center(
          child: ExampleParallax(),
        ),
      ),
    );
  }
}

class ExampleParallax extends StatelessWidget {
  const ExampleParallax({
    super.key,
  });

  @override
  Widget build(BuildContext context) {
    return SingleChildScrollView(
      child: Column(
        children: [
          for (final location in locations)
            LocationListItem(
              imageUrl: location.imageUrl,
              name: location.name,
              country: location.place,
            ),
        ],
      ),
    );
  }
}

class LocationListItem extends StatelessWidget {
  LocationListItem({
    super.key,
    required this.imageUrl,
    required this.name,
    required this.country,
  });

  final String imageUrl;
  final String name;
  final String country;
  final GlobalKey _backgroundImageKey = GlobalKey();

  @override
  Widget build(BuildContext context) {
    return Padding(
      padding: const EdgeInsets.symmetric(horizontal: 24, vertical: 16),
      child: AspectRatio(
        aspectRatio: 16 / 9,
        child: ClipRRect(
          borderRadius: BorderRadius.circular(16),
          child: Stack(
            children: [
              _buildParallaxBackground(context),
              _buildGradient(),
              _buildTitleAndSubtitle(),
            ],
          ),
        ),
      ),
    );
  }

  Widget _buildParallaxBackground(BuildContext context) {
    return Flow(
      delegate: ParallaxFlowDelegate(
        scrollable: Scrollable.of(context),
        listItemContext: context,
        backgroundImageKey: _backgroundImageKey,
      ),
      children: [
        Image.network(
          imageUrl,
          key: _backgroundImageKey,
          fit: BoxFit.cover,
        ),
      ],
    );
  }

  Widget _buildGradient() {
    return Positioned.fill(
      child: DecoratedBox(
        decoration: BoxDecoration(
          gradient: LinearGradient(
            colors: [Colors.transparent, Colors.black.withOpacity(0.7)],
            begin: Alignment.topCenter,
            end: Alignment.bottomCenter,
            stops: const [0.6, 0.95],
          ),
        ),
      ),
    );
  }

  Widget _buildTitleAndSubtitle() {
    return Positioned(
      left: 20,
      bottom: 20,
      child: Column(
        mainAxisSize: MainAxisSize.min,
        crossAxisAlignment: CrossAxisAlignment.start,
        children: [
          Text(
            name,
            style: const TextStyle(
              color: Colors.white,
              fontSize: 20,
              fontWeight: FontWeight.bold,
            ),
          ),
          Text(
            country,
            style: const TextStyle(
              color: Colors.white,
              fontSize: 14,
            ),
          ),
        ],
      ),
    );
  }
}

class ParallaxFlowDelegate extends FlowDelegate {
  ParallaxFlowDelegate({
    required this.scrollable,
    required this.listItemContext,
    required this.backgroundImageKey,
  }) : super(repaint: scrollable.position);


  final ScrollableState scrollable;
  final BuildContext listItemContext;
  final GlobalKey backgroundImageKey;

  @override
  BoxConstraints getConstraintsForChild(int i, BoxConstraints constraints) {
    return BoxConstraints.tightFor(
      width: constraints.maxWidth,
    );
  }

  @override
  void paintChildren(FlowPaintingContext context) {
    // Calculate the position of this list item within the viewport.
    final scrollableBox = scrollable.context.findRenderObject() as RenderBox;
    final listItemBox = listItemContext.findRenderObject() as RenderBox;
    final listItemOffset = listItemBox.localToGlobal(
        listItemBox.size.centerLeft(Offset.zero),
        ancestor: scrollableBox);

    // Determine the percent position of this list item within the
    // scrollable area.
    final viewportDimension = scrollable.position.viewportDimension;
    final scrollFraction =
    (listItemOffset.dy / viewportDimension).clamp(0.0, 1.0);

    // Calculate the vertical alignment of the background
    // based on the scroll percent.
    final verticalAlignment = Alignment(0.0, scrollFraction * 2 - 1);

    // Convert the background alignment into a pixel offset for
    // painting purposes.
    final backgroundSize =
        (backgroundImageKey.currentContext!.findRenderObject() as RenderBox)
            .size;
    final listItemSize = context.size;
    final childRect =
    verticalAlignment.inscribe(backgroundSize, Offset.zero & listItemSize);

    // Paint the background.
    context.paintChild(
      0,
      transform:
      Transform.translate(offset: Offset(0.0, childRect.top)).transform,
    );
  }

  @override
  bool shouldRepaint(ParallaxFlowDelegate oldDelegate) {
    return scrollable != oldDelegate.scrollable ||
        listItemContext != oldDelegate.listItemContext ||
        backgroundImageKey != oldDelegate.backgroundImageKey;
  }
}

class Parallax extends SingleChildRenderObjectWidget {
  const Parallax({
    super.key,
    required Widget background,
  }) : super(child: background);

  @override
  RenderObject createRenderObject(BuildContext context) {
    return RenderParallax(scrollable: Scrollable.of(context));
  }

  @override
  void updateRenderObject(
      BuildContext context, covariant RenderParallax renderObject) {
    renderObject.scrollable = Scrollable.of(context);
  }
}

class ParallaxParentData extends ContainerBoxParentData<RenderBox> {}

class RenderParallax extends RenderBox
    with RenderObjectWithChildMixin<RenderBox>, RenderProxyBoxMixin {
  RenderParallax({
    required ScrollableState scrollable,
  }) : _scrollable = scrollable;

  ScrollableState _scrollable;

  ScrollableState get scrollable => _scrollable;

  set scrollable(ScrollableState value) {
    if (value != _scrollable) {
      if (attached) {
        _scrollable.position.removeListener(markNeedsLayout);
      }
      _scrollable = value;
      if (attached) {
        _scrollable.position.addListener(markNeedsLayout);
      }
    }
  }

  @override
  void attach(covariant PipelineOwner owner) {
    super.attach(owner);
    _scrollable.position.addListener(markNeedsLayout);
  }

  @override
  void detach() {
    _scrollable.position.removeListener(markNeedsLayout);
    super.detach();
  }

  @override
  void setupParentData(covariant RenderObject child) {
    if (child.parentData is! ParallaxParentData) {
      child.parentData = ParallaxParentData();
    }
  }

  @override
  void performLayout() {
    size = constraints.biggest;

    // Force the background to take up all available width
    // and then scale its height based on the image's aspect ratio.
    final background = child!;
    final backgroundImageConstraints =
    BoxConstraints.tightFor(width: size.width);
    background.layout(backgroundImageConstraints, parentUsesSize: true);

    // Set the background's local offset, which is zero.
    (background.parentData as ParallaxParentData).offset = Offset.zero;
  }

  @override
  void paint(PaintingContext context, Offset offset) {
    // Get the size of the scrollable area.
    final viewportDimension = scrollable.position.viewportDimension;

    // Calculate the global position of this list item.
    final scrollableBox = scrollable.context.findRenderObject() as RenderBox;
    final backgroundOffset =
    localToGlobal(size.centerLeft(Offset.zero), ancestor: scrollableBox);

    // Determine the percent position of this list item within the
    // scrollable area.
    final scrollFraction =
    (backgroundOffset.dy / viewportDimension).clamp(0.0, 1.0);

    // Calculate the vertical alignment of the background
    // based on the scroll percent.
    final verticalAlignment = Alignment(0.0, scrollFraction * 2 - 1);

    // Convert the background alignment into a pixel offset for
    // painting purposes.
    final background = child!;
    final backgroundSize = background.size;
    final listItemSize = size;
    final childRect =
    verticalAlignment.inscribe(backgroundSize, Offset.zero & listItemSize);

    // Paint the background.
    context.paintChild(
        background,
        (background.parentData as ParallaxParentData).offset +
            offset +
            Offset(0.0, childRect.top));
  }
}

class Location {
  const Location({
    required this.name,
    required this.place,
    required this.imageUrl,
  });

  final String name;
  final String place;
  final String imageUrl;
}

const urlPrefix =
    'https://docs.flutter.dev/cookbook/img-files/effects/parallax';
const locations = [
  Location(
    name: 'Mount Rushmore',
    place: 'U.S.A',
    imageUrl: '$urlPrefix/01-mount-rushmore.jpg',
  ),
  Location(
    name: 'Gardens By The Bay',
    place: 'Singapore',
    imageUrl: '$urlPrefix/02-singapore.jpg',
  ),
  Location(
    name: 'Machu Picchu',
    place: 'Peru',
    imageUrl: '$urlPrefix/03-machu-picchu.jpg',
  ),
  Location(
    name: 'Vitznau',
    place: 'Switzerland',
    imageUrl: '$urlPrefix/04-vitznau.jpg',
  ),
  Location(
    name: 'Bali',
    place: 'Indonesia',
    imageUrl: '$urlPrefix/05-bali.jpg',
  ),
  Location(
    name: 'Mexico City',
    place: 'Mexico',
    imageUrl: '$urlPrefix/06-mexico-city.jpg',
  ),
  Location(
    name: 'Cairo',
    place: 'Egypt',
    imageUrl: '$urlPrefix/07-cairo.jpg',
  ),
];